TM 5-3895-374-24-2
SECTION VI
Disassembly/Assembly Instructions
Refer to Section VII for Sectional Drawings.
-Preparation For Disassembly:
SIHI’s ZTN Pumps are of the back pull-out design. It is
not necessary to remove the casing (2) from the system.
1.
Lock out power supply to motor.
2.
Close isolating valves in suction and discharge
lines.
3.
Allow liquid to cool.
4.
Disconnect
coupling.
Refer
to
coupling
manufacturer’s instructions.
5.
Remove motor from baseplate. Not necessary if
spacer type coupling is used.
6.
Be prepared to catch all the liquid that is trapped
inside the pump and in the piping between the
closed valves. There are NO drain connections
in the pump casing.
B - Disassembly
1.
Remove foundation bolts in the support foot (40)
and bolts (170).
2.
Remove rotating element complete with bearing
housing (210) and cover (3).
3.
Remove impeller nut (286) and lockwasher
(292), impeller (30) and key (256).
4.
Remove cover (3) complete with sleeve bearing
(241).
5.
Remove bolts (163) and bearing cover (221).
6.
Press shaft (200) complete with bearing (230)
out through the bearing housing.
7.
Remove retaining ring (260), bearing (230), and
spacer ring (266). Clean parts and check for
damage and/or wear.
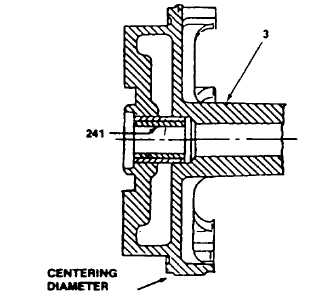
8.
Press sleeve bearing (241) complete with steel
sleeve out of Figure 4 cover (3). It may be
necessary to destroy the sleeve bearing (241) to
remove it. Careful not to damage the cover (3). If
necessary remove sleeve by machining in lathe.
Chuck cover (3) in a lathe to assure maximum
total indicator reading (T.I.R.) of 0.002 in.
(0.05mm) at centering diameter (see Figure 4).
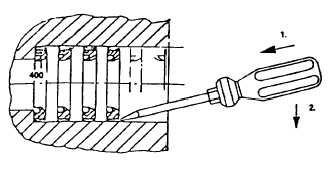
9.
Remove the radial seal rings (400). The radial
seal rings are metal encapsulated. Insert small
screwdriver in-between the seal ring and the
cover (3). A twisting action will deform ring
sufficient to facilitate the removal. During the
disassembly the radial seal ring must be
deformed in order to remove. Removed rings
can not be reused.
Figure 5
C - Preparation For Assembly
In the event the sleeve bearing (241) and the radial
seal rings (400) are not removed, continue to Paragraph
D.
1.
Press new sleeve bearing (241) into cover (3).
Check for run out, refer to Paragraph B item 8.
2.
Check shaft surface for wear under seal rings.
After period of operation, it is normal to observe
wear tracks on the shaft surface under the seal
rings. It is possible to get a second life out of the
shaft by locating the radial seal rings in a
different position than originally supplied, see
Figure 7. Old design pumps may have 3 to 4
mm wide spacers which can be used to achieve
the above mentioned arrangement. Make sure
the rings are installed as shown in Figure 6 or 7,
note the reverse position of the outer most radial
seal ring. Use of the SIHI Radial Seal Ring
Gauge will facilitate assembly.
3.
Fill the space between the sealing rings, (400)
with a high temperature grease with a dropping
point over 338°F. (170°C.) such as:
-Esso Unirex N3
-Shell Aero Grease No. 16
-Dow Molykote BR-2 Plus
-Or Equivalent
4. Install bearing seal ring (426). note position.
(page 3 - 1146)
Figure 4