TM 5-3895-368-14&P
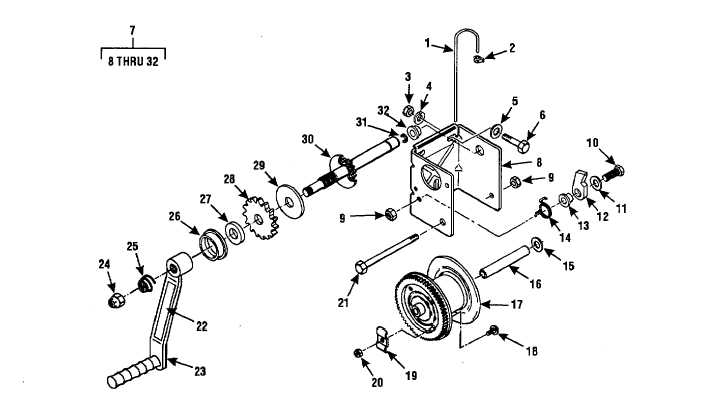
1. Wire Rope
2. Clip
3. Nut (3)
4. Lockwasher (3)
5. Washer (3)
6. Capscrew (3)
7. Winch Assembly
8. Base
9. Locknut (2)
10. bolt
11. Washer
12. Pawl
13. Spacer
14. Spring
15. Spring
16. Spacer
17. Reel
18. Bolt
19. Clamp
20. Nut
21. Shaft
22. Decal
23. Handle
24. Locknut
25. Spring
26. Bushing
27. Washer
28. Ratchet Wheel
29. Pressure Plate
30. Drive Shaft
31. Retaining Ring
32. Bushing
Figure 4-2. Hand Winch Assembly.
(4)
Remove four bolts and nuts from lower
flanged coil connection, and lift coil (4)
from the storage tank. Remove ring
gasket (6) from face of flanges.
(5)
Using new ring gaskets (6), install the
storage tank heating coil (4) in reverse of
instructions of paragraphs (1) through (4)
above.
g. Refer to figures 2-2 through 2-12 for
identification and location of components, removing,
repairing or replacing as required. See paragraph 4-4 for
instructions on repair of the hand winch (Figure 2-11),
and paragraph 4-5 for repair instructions on the electric
hoist (2, Figure 2-12).
4-4.
Winch Repair Instructions.
a. Removal.
(1)
Loosen nut (20, Figure 4-2), releasing
clamp (19) from wire rope (1). Unreeve
wire rope from the reel (17).
(2)
Remove three nuts (3), lockwashers (4),
flat washers (5) and capscrews (6) that
secure the hand winch assembly (7) to
bracket on melter storage tank.
4-3