TM 5-3895-374-24-2
Alignment
CHECK ALIGNMENT AFTER MOUNTING
For detailed coupling alignment procedures see Viking
service bulletin ESB-61.
The pump, drive, and motor were properly aligned at the
time they were assembled. During shipping and
mounting the alignment is often disturbed. CHECK IT!
1.
Check pump ports to be sure they are square
and in proper position; shim or move pump as
required.
2.
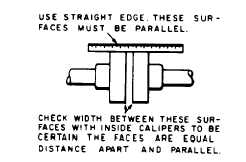
If the pump is driven by a flexible coupling(s)
either direct connected to the motor or through a
reducer, remove any coupling guards or covers
and check alignment of the coupling halves. A
straightedge (a piece of key stock works nicely)
across the coupling must rest evenly on both
rims at the top, bottom, and sides. See Figure 6.
3.
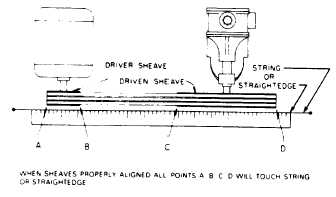
If the pump is driven by V-belts, check the
alignment by using a long straightedge or tightly
drawn string across the face of the sheaves.
See Figure 6A.
4.
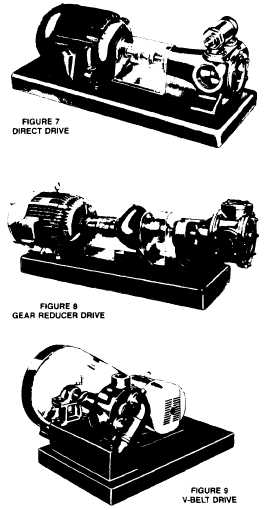
Make a final check on alignment after piping is
hooked up. See item 13 under "Installation -
Piping". Figures 7, 8, and 9 show typical units--
direct, gear reducer and V-belt drive.
5.
For high temperature applications (those above
300°F)
allow
pump
to
reach
operating
temperature, then recheck alignment.
FIGURE 6
FIGURE 6A
Piping
The cause of many pumping problems can be traced to
suction piping It should always be as large and short as
practical. For help In selecting the proper size piping,
both suction and discharge. refer to Viking General
Catalog Section 510.
Before starting layout and installation of your piping
system, consider the following points:
1 Never use piping smaller than the pump port
connections.
2 Be sure the inside of the pipe is clean before
hooking it up.
3 Foot valve - When pumping a light liquid with a
suction lift, a foot valve at the end of the suction
piping or a check valve In the first horizontal run
will hold the liquid in the line and make it easier
for the pump to prime. Be sure the foot or check
valve is big enough so that it doesn't cause
excessive line loss.
Page 3 - 1204


