TM 5-3895-374-24-2
955-257
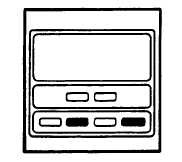
6.5 SETTING TRANSIENT NUMBER
An additional: security code protects the part number. To
change the part number push the two keys indicated in
Figure 6-2 simultaneously.
FIGURE 6-2
A flashing digit will appear at the first digit position. The digit that is flashing can be changed by using the arrow keys. The
PARAM DISPLAY key advances the flashing digit and the LAST key backs up the digit. You can change any of the part
numbers within the rules stated in paragraph 6.4. Be very careful not to enter an illegal part number.
If you are recovering from the DATA LOST mode be sure to enter the complete part number. When the part number is
correct push the PARAM DISPLAY key until the next display appears.
6.6 SETTING THE DISPLAYED UNITS
The controller will accept any 2 alphanumeric characters for displayed units. The only limitation is that the temperature F
or C units MUST be in the right hand position.
The best way to see how units are set is to push an arrow key while watching the display. All numbers
and letters are available in both positions. UNITS setting starts with the left hand digit. Push the PARAM
DISPLAY key to move to the right hand digit. The LAST key will back up right to left if needed. The DOWN
key will scroll the digit reverse to the UP key. A blank is available in the sequence for single character units. The left hand
position can be a blank. Push PARAM DISPLAY key when units are correct.
IMPORTANT NOTE: Changing units between F and C does not convert the numerical values of any setpoints,
alarms, or span limits. Each setpoint, alarm and span limit must be individually changed to correspond to the new
units of measurement. When no units are specified the controller uses the degree C linearization table for
thermocouple or RTD input.
ECLIPSE INSTRUMENTATION DIVISION
(page 3 - 1119)