TM 5-3895-374-24-1
6. Place a 1/8" dia bead of Dow Corning RTV732 on the
flange of the housing half Place other half of housing
(without covers or carriers Installed), insert dowel pins,
and draw together evenly to prevent damage to parts
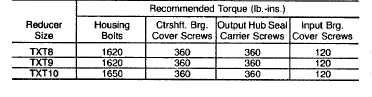
The final wrench torque should be per Table 3.
7. Place output bearing cup in housing and tap in place
Install output seal carrier and draw down with two (2)
bolts 180° apart to 50 inch pounds of torque, loosen bolts
and retighten finger tight Measure clearance between
housing and carrier flange at each bolt and average Add
010 to average and make-up shim pack. Install shim
pack and torque down all seal carrier bolts to 360 In-lb
Use dial indicator to check end play Add or remove
shims until Indicator reads 001" to 003".
8. Adjust the countershaft bearings using the same
method as in step 7 The axial end play should be 001" to
003"
9. Again using the same procedure as In step 7, adjust
the input shaft bearings to an end play of 002" to 003"10.
Total shim thickness per carrier or cover should not
include more than 009" plastic shims All other shims
should be metal and each plastic shim should be
inserted between two metal shims Place 1/8" dia bead of
Dow Corning RTV732 sealant on face around the I D of
the last shim and install the carriers or covers In the
reducer housing. Torque carrer bolts to torque values In
Table 3.
11. Extreme care should be used In Installing seals to
avoid damage due to contact with sharp edges of the
keyseat In the input shaft and holes In the output hub
This danger of damage and consequent oil leakage can
be decreased by covering the keyseat and the holes with
paper or tape which can be removed after seals are In
place Chamfer or burr housing bore if end of bore is
sharp or rough. Fill cavity between lips of seal with
grease Seals should be pressed or tapped with a soft
hammer evenly into place In the housing, applying force
only on the outer comer of the seals A slight oil leakage
at the seal may be evident during Initial running in, but
will disappear unless the seals have been damaged.
Table 3-Torque Values
(page 3-569)
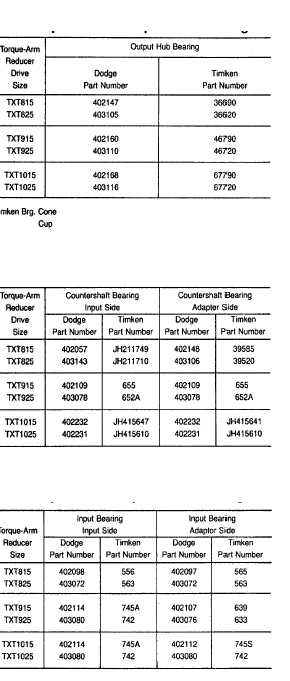
Table 4-Manufacturers’ Part Numbers For
Replacement Output Hub Bearings
Table 5-Manufacturers’ Part Numbers For
Replacement Countershaft Bearings
Table 6-Manufacurers’ Part Numbers For
Replacement Input Shaft Bearings