TM 5-3895-374-24-2
7. Clean housing flange surfaces on both halves,
making sure not to nick or scratch flange face. Place
a new bead of gasket eliminator on flange face and
spread evenly over entire flange leaving no bare
spots. Place other housing half into position and tap
with a soft hammer (rawhide not lead hammer) until
housing bolts can be used or draw housing halves
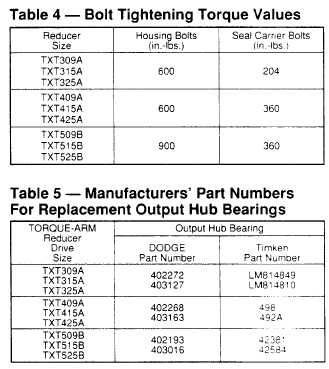
together. Torque housing bolts per torque values
listed below.
8. Place output hub seal carrier in position without shims
and install two carrier screws diametrically opposed.
Torque each screw to 25 lb.-ins. Rotate the output
hub to roll in the bearings and then torque each screw
once to 50 lb.-ins. Do not retorque screws. Again
turn output hub to roll in the bearings. With a feeler or
taper gage. measure the gap between the housing
and the carrier, clockwise from and next to each
screw. To determine the required shim thickness.
take the average of the two feeler gage readings
Remove carrier and install the required shims. Note:
Total shim thickness per carrier should not include
more than .009" plastic shims and each plastic shim
should be inserted between two metal shims. Place a
1/8" diameter bead of Dow Corning RTV732 sealant
on the face around the I.D. of the end shim (sealant
is to be between reducer housing and shim) and
install carrier on reducer housing. Torque carrier
bolts to value shown in Table 4. Output hub should
have an axial end play of .001" to .003".
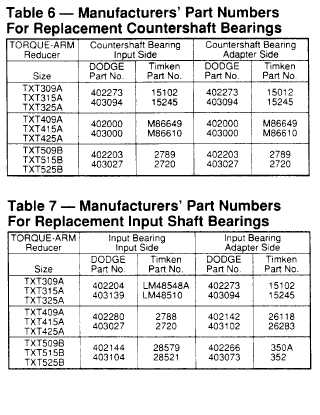
9. Adjust the countershaft bearings using the same
method as in step 8 above. The axial end play should
be .001" to .003".
10. Again using the same procedure as in step 8, adjust
the input shaft bearings, except the axial end play
should be .002" to .003".
11. Apply sealant to the input shaft cover gasket and
install input shaft cover in right-hand housing half.
Install input and output seals. Extreme care should
be used when installing seals to avoid damage due
to contact with sharp edges on the input shaft or
output hub. The possibility of damage and
consequent oil leakage can be decreased by
covering all sharp edges with tape or paper prior to
seal installation. Fill cavity between seal lips with
grease. Seals should be pressed or tapped with a
soft hammer evenly into place in the carrier applying
pressure only on the outer edge of the seals. A
slight oil leakage at the seals may be evident during
initial running in but should disappear unless seals
have been damaged.
12. Install bushing back-up plate and snap rings on
Taper Bushed reducers.
(page 3 - 1285)