TM 5-3895-374-24-1
INSTALLATION
INSTALLING THE COMPRESSOR
1.
Unpack the air compressor. Inspect the unit for
damage If the unit has been damaged In transit,
refer to the shipping label and report a damage claim
to the carrier. Do this Immediately, because there
are time limitations to damage claims.
2.
Check the compressor’s serial label (located on the
platform or on the back side of the receiver) to
ensure that you have received the model ordered,
and that it has the required pressure rating for its
intended use.
3.
Locate the compressor according to the following
guidelines.
WARNING: Never locate the compressor In an area
where there are fumes from flammable fluids
such as paint, solvents, or gasoline. It is
normal for the motor and pressure switch to
produce sparks while operating If sparks
come Into contact with flammable fumes,
they may Ignite, causing a fire or explosion.
Always operate the compressor In a well
ventilated area.
a. For
optimum
performance,
locate
the
compressor close to the power panel (see
Electrical Power Requirements on page 7), and
as close as possible to the place where the air
will be used This ensures maximum power to the
compressor and maximum air pressure to the
tool If both these conditions cannot be met, it is
better to locate the compressor close to the
power panel, and use a longer hose to reach the
usage area.
b.
The flywheel side of the unit must be at least 12
inches from any wall or obstruction, to ensure
sufficient air flow and cooling.
c
The compressor must be In a clean, well-
ventilated area for a good source of air and
adequate heat dissipation.
d.
In cold climates, locate the compressor In a
heated
building,
to
reduce
problems
with
lubrication, motor starting, and freezing of water
condensation
e.
Remove the compressor from the shipping pallet
and place It on the floor or a hard, level surface.
The compressor must be level to ensure proper
lubrication of the compressor pump and good
drainage of the condensed water in the receiver
tank.
CAUTION: The shipping pallet is not designed as a base
for an operating compressor. Operating the
compressor while It is on the pallet will void
your warranty.
f.
CAUTION: To prevent damage to tank and
compressor, the tank must be shimmed so the
pump Is level within 1/8" per lineal foot MAX to
distribute oil properly Fasten to floor and NEVER
force tank feet to floor without shims when
tightening. We also recommend the use of
vibration pads (094-0021) under tank feet See
Fig 2.
BREAKING IN THE COMPRESSOR
NOTE: The compressor Is shipped with break-in oil
which should be changed after the first 8 hours
of operation. Refer to page 12 To reduce
maintenance and repair problems, use only a
premium compressor oil. The compressor oil
used must be made from highly refined base
stocks and meet the minimum specifications
given on page 12.
1. Make sure the power is connected at the power
panel.
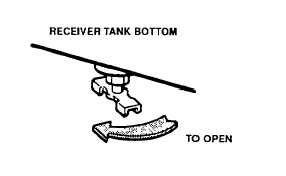
2. Open the petcock on the bottom of the receiver
tank See Fig 3.
3. Turn ON the main power disconnect The
compressor should start.
4. Run the compressor for about 20-30 minutes, to
break it In and ensure that the internal parts are
lubricated.
5. Shut OFF the main power disconnect Close the
petcock. Connect your air hose(s) to the receiver
outlet(s)
Figure 3. Receiver Tank Petcock
200-2009
(page 3-632)