page 3-704
TM 5-3895-374-24-2
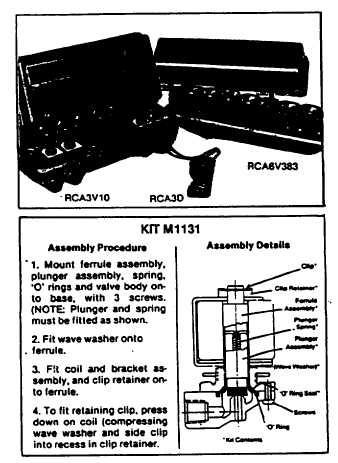
RCA 3D
Model RCA3V10
RCA6V383
INSTALLATION and
SERVICE INSTRUCTIONS
DESCRIPTION
The model RCA3D is a single solenoid valve assembly
with either AP coil (24" leads), Q coil (1/4” spades), or
QT coil (screw terminals), and the model RCA 6V3_3
and RCA3V_ are Nema 4 aluminum enclosures with
integral solenoid valves. The number stamped in the
position indicated by_ in the model number indicates the
number of valves in the assembly. All coils have screw
terminals for one step electrical connections The
enclosures have two, 314" tapped conduit connections.
Each solenois valve has a 118" FNPT Inlet connection,
1/8" FNPT inlet connection, 1/8" orifice, rated 110 PSI
and exhausts to atmosphere.
OPERATION
Each valve opens when voltage is applied to the coil and
the resultant magnetic field attracts the 430 SS plunger
with integral disc off the seat. In the deenergized
position the plunger is held on the seat by a spring and
the system pressure assists in seating. The only moving
parts are the plunger and spring. To manually override
the valve, simply insert a rod, diameter of a paper clip,
into the outlet and push.
INSTALLATION
The ideal mounting arrangement is to have the coils in
the vertical and upright position. This position shields the
outlet, preventing rain or other foreign substances from
settling therein. Screw terminals in the coil provide for
one step electrical connections.
SERVICE
The valve requires no periodic service. Should a valve
malfunction the cause Is usually dirt from the system. A
kit, M1131. Is available to restore a worn valve to a new
condition.
VALVE WILL NOT OPEN:
Step 1.
Confirm adequate electrical service.
Step 2.
Remove cover on Nenma4assemblies
Step 3.
Coil-check continuity, or, I metallic click is heard
when coil Is energized, the coil is not the source
of the problem.
Step 4.
Depressurize the system.
Step 5.
Remove body for access to plunger, spring and
orifice. Check orifice to be sure it is not blocked
or for other foreign objects that may prohibit
operation.
Step 6.
If dirt was problem clean and reassemble.
Step 7.
If plunger is excessively worn, to where It
lodged In the ferrule assembly, rebuild valve
with kit M1131.
VALVE WILL NOT CLOSE:
Step 1.
Disconnect the electrical signal to be sure coil is
not continuously energized.
Step 2.
Depressurize the system.
Step 3.
Remove body for access to plunger, spring and
orifice, check for dirt In valve preventing disc
from sealing on seat.
Step 4.
If dirt was the problem clean and
reassemble.
Step 5.
If disc Is excessively worn to where It will not
seal on the seat or plunger is Jammed In
enclosing tube because of excessive wear,
rebuild valve with kit, M1131.*
*To restore a vale to a new condition, all Parts Included
In the kit should be changed.