TM 5-3895-374-24-2
Table 11
Pilot Orifice Schedule
DRILL SIZE
BURNER
NATURAL
PROPANE
MODEL
GAS
GAS
C1-G(O)
Standard 6” Fan
#36
#48
Optional
7x3 or 7-5/8x3-1/2 Fan
#30
#48
C2-G(O)
Standard 7x3 Fan
#36
#48
Standard 7-5/8x3-1/2 Fan
#36
#48
Optional
8-3/8x3-1/2 Fan
#36
#48
DRILL SIZE
BURNER
NATURAL
PROPANE
MODEL
GAS
GAS
C3-G(O)
Standard 8-3/8x3-1/2 Fan
#30
#48
Optional
9x4 Fan
#30
#48
C4-G(O)
Standard 8-3/8x4-1/2 Fan
Standard 9x4 or 9x5-1/2 Fan #30
#48
C5-G(O)
Standard 10 3/4x 5-1/2 Fan
#30
#48
C5-G(O)•B
Standard 10 3/4 x 5 1/2 Fan None
#19
C6-G(O)
Standard 10 3/4 x 5 1/2 Fan None
#19
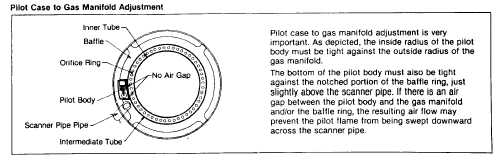
Gas Pilot Ignition Adjustment
Excessive gas pressure and insufficient air may be the most
common causes of pilot ignition failure. Burners with
automatic air dampers linked to the gas valve or damper
motor should have pilot gas pressures as follows:
C1-0
(Gas Pilot) C1-GO-10, C1-GO-12
With Std. #36 Orifice
2 ½” - 3 ½” W.C.
With 7” Fan & #30 Pilot Orifice
1 ½” - 2 ½” W.C.
C2-OA (Gas Pilot) C2-G(O)-15
2” - 4” W.C.
C2-OB (Gas Pilot) C2-G(O)-2OA(B)
1 ½” - 3” W.C.
C3-O
(Gas Pilot) C3-G(O)-20, C3-G(O)-25
1 ½ “-2” W.C.
C4-O
(Gas Pilot) C4-G(O)-25, C4-G(O)-30
1 ½”- 2”W.C.
C5-O
(Gas Pilot) C5-G(O)-30, C5-G(O)-30B 1 ½” - 2” W.C.
C6-O
(Gas Pilot) C6-G(O)-30
1 ½” - 3” W.C.
Fixed fired (on-off) burners with manually adjustable dampers may
need slightly higher pressures, but in any event do not increase
pressure beyond that required for a stable flame signal. Gas
pressure should be read at the test tee on the pilot gas supply pipe
with a manometer or 0-10” w.c. gauge. Look for stability of gas
pressure at all times. For burners equipped with automatic air
dampers (linked to the gas valve or damper motor), there is a
tendency to set the air dampers in a closed, barely open position.
This action may produce insufficient air for dependable pilot
ignition. Air damper openings should be at least 1/1” on each
damper or 1/2” on one, with the other nearly closed. Some job
conditions or heat exchangers may require larger air damper
openings or different gas pressures than those shown above. For
dependable pilot ignition, always use air damper setting to provide
MOST air and LOWEST pilot gas pressure setting allowable for
good pilot signal at all times. On fixed fire (on-off) burners the
manually adjustable air damper setting will need to match air for
proper CO2 setting. The following steps should be taken:
1.
Remove pilot assembly and check for proper orifice size
(the orifice size is stamped into the hex brass fitting
connected to the pilot head nozzle assembly) and spark
gap. The spark gap between the electrode and the
outside radius of the gas pilot assembly should be 1116”
3132”. Do not set spark to arc against the pilot head
nozzle. See Figures 35 and 36.
2.
Close checking cock (test cock). Start up burner and
stop flame safeguard control timer with “check” switch
during pilot ignition. Access to “check” switch on Fireye
D Series is best obtained by using a small right angle
tool, such as an Allen Wrench. If there is no check
switch, disconnect wire which energizes main automatic
gas valve, so that air damper is not actuated.
3.
Observe pilot signal with DC voltmeter or microammeter
and reduce pilot gas pressure to a point where the signal
is erratic or reduced substantially from initial reading.
4.
Raise the pilot gas pressure to the point where the signal
is again stable. Remove scanner and use a mirror to
view the pilot flame through the scanner pipe (a live
flame from cigarette lighter or butane torch may be
needed to keep scanner actuated). Be sure to get full
coverage of scanner pipe by pilot flame.
Release “check” switch or reconnect main automatic gas
valve (see step #2) and observe meter as main gas valve
opens and moves air damper. If there is a drop in signal
as this happens, increase pilot pressure slightly until
signal is steady at all times.
Refer to page 35, “Gas Pilot Flood Test” as another
means of determining proper pilot fuel/air mixture.
Figure 34
(page 3-986)